Fault Code Retrieval/Clearing
Retrieving Fault Codes Manually
Retrieve fault codes by enabling the system’s self-diagnostic mode.
Note: You can also use a PC- based service tool, such as ServiceRanger to retrieve fault codes.
- Place the shift lever in neutral.
- Set the parking brake.
- Turn key on with engine off.
Note: If the engine is already running, you may still retrieve codes; however, do not engage the starter if the engine stalls.
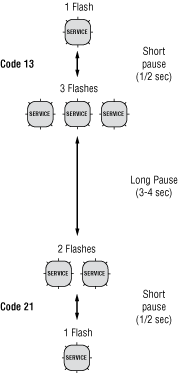
- To Retrieve Active Codes: Key on. Turn key off and on 2 times within five seconds ending with the key on. After 5 seconds, the Service light begins flashing two-digit fault codes. If no faults are active, the service light will flash code 25 (no codes). This is also the procedure to enter, See "Product Diagnostic (PD) Mode" for details.
Note: An “88” may show up in the dash at key on, which is a normal power-up test of the display.

- To Retrieve Inactive Codes: Turn key on. Turn the key off and on 4 times within five seconds ending with the key in the on position. After 5 seconds, the Service light begins flashing two-digit fault codes. If no faults are active, the service light will flash code 25 (no codes).

- Two digit fault codes will be displayed in the gear display. Some vehicle may be equipped with a service light.
- Observe the sequence of flashes on the service light and record the codes. A 1- to 2-second pause separates each stored code, and the sequence automatically repeats after all codes have been flashed.

Clearing Fault Codes Manually
The following procedure clears all Inactive fault codes from the TECU’s memory. Active fault codes are automatically cleared when the fault has been corrected.
Note: You may use a PC-based service tool, such as ServiceRanger, to clear fault codes.
- Place shift lever in neutral.
- Set parking brake.
- Turn key on with engine off.
- Turn key off and on 6 times within 5 seconds ending with key on.

Note: If the codes have been successfully cleared, the Service light will come on and stay on for five seconds. The gear display will show 25 (no codes).
- Turn the key off and allow the system to power down.
Retrieving Fault Codes with ServiceRanger
This section determines if the TECU is communicating on the vehicle's J1939 data link and if the component has set any fault codes. Proper system operation requires the TECU to communicate with other ECUs on the vehicle's J1939 data link.
Note: This procedure requires ServiceRanger 3.0 or later and an approved RP1210A communications adapter that supports J1939 communications.
Detecting Components
- Connect the service PC to the vehicle's 9-way J1939 diagnostic port connector with an approved RP1210A communications adapter.
- Start the ServiceRanger program and verify that a connection has been established with the vehicle's J1939 data link.
- If the TECU is not detected by ServiceRanger, proceed to the Electrical Pretest procedure to ensure the TECU has power, and that all components are properly connected the vehicle's J1939 data link.
Viewing Fault Codes
View the Vehicle Fault Codes screen in ServiceRanger and verify if any Active or Inactive codes have been set.
- If an Active code is present, record the vehicle fault information and proceed to Diagnostic Procedure in this manual for the Active code. Do not clear any codes at this time.
- If only Inactive codes are present, record the vehicle fault information and clear all fault codes. Road test the vehicle to verify proper operation.
Clearing Fault Codes with ServiceRanger
After all repairs have been made and the system is functioning normally, clear all vehicle codes before placing the vehicle back into service.
Clearing Fault Code
- Connect the service PC to the vehicle and start ServiceRanger.
- View the Vehicle Fault Codes screen and select Clear All.
- Refresh the screen to verify all Inactive codes have been cleared, and that no Active codes are present.