Fault Code 66: Gen2 ECA Battery Voltage
J1587: MID 130 PID 34 FMI 3, 4
J1939: SA 3 SPN 520271 FMI 3, 4
Overview
The UltraShift PLUS transmission is equipped with an Electric Clutch Actuator (ECA) that controls the position of the clutch assembly. The ECA operates on a non-switched battery power supply.Fault Code 96 indicates battery power to the ECA is outside of the acceptable ECA operating range, but is specific to systems that use a Gen2 ECA. Troubleshooting for this procedure is specific to the Gen2 ECA and associated harnesses.
Note: The troubleshooting procedure for Fault Code 66 may direct users to use this troubleshooting procedure if the vehicle is equipped with a Gen2 ECA, even if Fault Code 96 was not set by the transmission. This is because some transmission software versions do not set Fault Code 96.
Detection
ECA monitors the battery voltage supply it receives. If the supplied voltage falls below operating range or spikes significantly above operating range, the ECA will broadcast a fault condition to the TECU, which sets the fault code Active.
Conditions to Set Fault Code Active
FMI 3 – Voltage Above Normal or Shorted High: ECA battery voltage rises above 34 volts for 2 seconds or longer.
FMI 4 – Voltage Below Normal or Shorted Low: ECA battery voltage falls below 8.5 volts for 2 seconds or longer and the TECU has not detected low or weak battery voltage.
Fallback
All FMIs
- “F” flashes in gear display.
- Service light flashes (if equipped).
- Engine does crank and/or start.
- Transmission does not engage a gear from neutral.
- When the transmission is in gear, it will not allow up shifts.
- ECA may maintain the current clutch position using the clutch holding device.
- ECA may move the clutch to the closed position (clutch engaged against engine flywheel).
Conditions to Set Fault Code Inactive
FMI 3: ECA battery voltage drops below 32 volts for 6 seconds.
FMI 4: ECA battery voltage rises above 9 volts on 12-volt chassis or above 18 volts on 24-volt chassis for 6 seconds.
Possible Causes
FMI 3
- Starting/Charging System
- Alternator/Generator failure
- Improper vehicle jump-start
FMI 4
- ECA Power Harness
- Damaged wiring between the vehicle batteries and 2-Way Gen2 ECA Connector
- Bent, spread, corroded or loose terminals
- Wiring shorted to ground, shorted to power or open
- Damaged in-line connectors between the vehicle batteries and 2-Way Gen2 ECA Connector, if equipped
- ECA 40-amp Fuse
- Bent, spread, corroded or loose fuse terminals
- Fuse not properly seated or connected
- Vehicle Batteries
- Internal failure
- Starting/Charging System
- Alternator/Generator failure
- ECA
- Internal failure
Component Identification
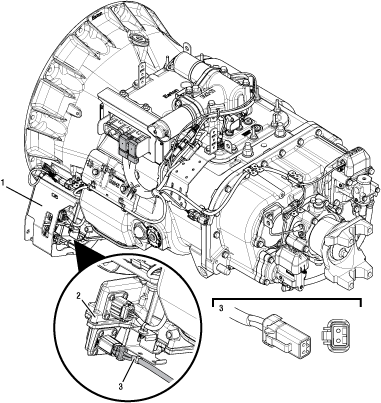 |
1. ECA Shield 2. Electronic Clutch Actuator (ECA) 3. 3-Way ECA Connector |
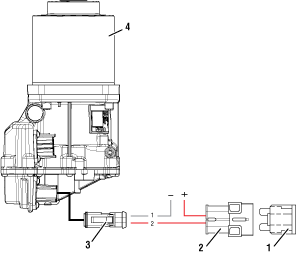 |
1. 40-amp Fuse 2. In-line Fuse Holder 3. 2-Way Gen2 ECA Connector 4. Gen2 Electronic Clutch Actuator (ECA) |
 |
Fault Code 66 Troubleshooting Gen2 ECA
Record the transmission fault codes, FMIs, occurrences, and timestamps from the Service Activity Report created during the Diagnostic Procedure.
Key on with engine off.
Connect ServiceRanger.
Update transmission and ECA software to latest available level, if not completed during the Diagnostic Procedure.
Notice
If Fault Code 66 is Inactive and there are other fault codes, troubleshoot all Active fault codes.
If Fault Code 66 is Active, Go to Step B
If Fault Code 66 is Inactive, Go to Step C
Key off.
NoticeKey on with engine off.
Connect ServiceRanger.
Retrieve and record the transmission fault codes and FMIs, and their occurrences and timestamps.
Note: Low batteries or jump starting the vehicle can induce Fault Code 66.
If Fault Code 66 stays Active, Go to Step D
If Fault Code 66 changed to Inactive, Go to Step C
Set parking brake and chock wheels.
Place transmission in PD Mode. See more about Product Diagnostic (PD) Mode.
Note: Transmission does not enter PD Mode when Active fault codes exist.

Wiggle wiring and connections of ECA Power Supply Harness between batteries and 2-Way Gen2 ECA Connector. Look for signs of pinched or chafed wiring. Verify all connections are clean and tight.
Exit PD Mode by powering down.
Notice
If any fault sets Active during PD Mode, refer to OEM guidelines for repair or replacement of ECA Power Supply Harness. Go to Step V
If no fault sets Active while wiggling the ECA Power Supply Harness, Go to Step D
Key off.
Set parking brake and chock wheels
Load test each vehicle battery per OEM specifications. Record reading(s).
If any battery does not pass the Load Test, refer to OEM guidelines for repair or replacement of batteries. Go to Step V
If all batteries pass the Load Test, Go to Step E
| Battery | Voltage Drop | Load Test Status (Pass/Fail) |
|---|---|---|
| 1 | ||
| 2 | ||
| 3 | ||
| 4 | ||
| 5 |
Key off.
Inspect the ECA Power Supply Harness between the batteries and the ECA for signs of rubbing or chafing to the wiring.
Inspect the ECA 40-amp In-line Fusible Link or Fuse Holder Con-nections for damage and bent, spread, corroded or loose terminals.
Note: Some chassis use a power and ground distri-bution block separate from the battery or may route power and ground to the starter. Be sure to clean and inspect connections at this location and at the battery.
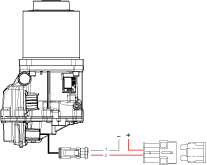
If damage to the ECA Power Supply Harness is found, refer to OEM guidelines for repair or replacement. Go to Step V
If no damage is found, Go to Step F
Key off.
Disconnect 2-Way Gen2 ECA Connector.
Verify connector is free from any corrosion; the ter-minals are not bent, spread or loose; and there is no damage to the connector body.
Inspect ECA side of 2-Way Gen2 ECA Connector, verify connector is free from any corrosion, the terminals are not bent, spread or loose; and there is no damage to the connector body.

If damage is found to the 2-Way Gen2 ECA Connector, refer to OEM guidelines for repair or replacement. Go to Step V
If damage to the ECA side of 2-Way Gen2 ECA Connector is found, replace Electronic Clutch Actuator (ECA). Go to Step V
If no damage is found, Go to Step G
Key off.
Measure voltage between 2-Way Gen2 ECA Connector Pin 2 (Battery positive) and Pin 1 (Battery nega-tive). Record reading(s) in table.
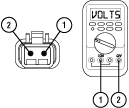
Compare reading(s) in table.
If readings are out of range, refer to OEM guidelines for repair or replacement of the ECA Power Supply Harness. Go to Step V
If readings are in range, Go to Step H
| Pins | Range | Reading(s) |
|---|---|---|
| 1 to 2 | Within 1.2 V of Battery Positive (+) |
Key off.
Measure voltage between 2-Way Gen2 ECA Connector Pin 2 (Battery positive) and ground. Record read-ing(s) in table.
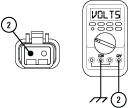
Compare reading(s) in table.
If readings are out of range, Pin 2 (Battery posi-tive) and Pin 1 (Battery negative) wires are incorrectly pinned in the 2-Way Gen2 ECA Connector. Refer to OEM requirements for repair or replacement. Go to Step V
If readings are in range, Go to Step I
| Pins | Range | Reading(s) |
|---|---|---|
| 2 to Ground | Within 1.2 V of Battery Positive (+) |
Key off.
Load test the 2-Way Gen2 ECA Connector and ECA Power Supply Harness with an external load source. Use a sealed beam headlamp or blower motor attached to Pin 2 (Battery positive) and Pin 1 (Battery negative). Load Test for 5 minutes to verify the harness will carry a load with the 40-amp fuse or fusible link installed.

Wiggle the ECA Power Supply Harness during the Load Test from the vehicle batteries to ECA.
If the ECA Power Supply Harness does not carry a load, refer to OEM guidelines for repair or replacement. Go to Step V
If the ECA Power Supply Harness carries a load, Go to Step J
Key off.
NoticeSet parking brake and chock wheels.
Reconnect all connectors and verify that all components are properly installed.
Key on with engine running.
Connect ServiceRanger.
Depress and hold service brake for 15 seconds.
Release service brake.
Retrieve and record the transmission fault codes and FMIs, and their occurrences and timestamps.
If Fault Code 66 is Inactive, no problem was found. The intermittent nature of the fault makes it likely that the problem is in ECA Power Supply Harness and/or battery/charging system. Contact OEM for further help troubleshooting the wiring and/or battery/charging system. Go to Step V
If Fault Code 66 is Active and no fault was found with the ECA Power Supply Harness or battery/charging system, replace the Electronic Clutch Actuator (ECA). Go to Step V
Key off.
Reconnect all connectors and verify that all components are properly installed.
Key on with engine off.
Clear fault codes using ServiceRanger.
Drive vehicle and attempt to reset the code or duplicate the previous complaint.
Check for fault codes using ServiceRanger.
If no fault codes set and the vehicle operates properly, test complete.
If Fault Code 66 sets Active during the test drive, Go to Step A
If a fault code other than 66 sets, troubleshoot per Fault Code Isolation Procedure Index.